Introduction (WIP)
- TODO: add a welcome message
- TODO: add a section explaining why this course exist (try to make things easier to learn, learning to use qml, etc.)
What is QML
Qt offers two ways of creating user interface: Qt Widgets and Qt Quick. Qt widget let's you create user interface entirely in C++ whereas Qt Quick introduce a new language called QML to describe the user interface.
Qt Widget
Qt Widgets is mainly focused on creating desktop native looking application. It is quite fast and very easy to integrate with c++, but often feel dated and is difficult to customize.
Qt Quick
QML is a user interface markup language developped by Qt. It is made to develop user interface very quickly, it is highly customizable and can run virtualy anywhere, from desktop, to mobile and embeded. It it also very fast, but as it is a new language, it is sometimes quite hard to grasp and can be unpredictable. Qt Quick is the framework and the library build around the creation of application with QML.
What this course cover
- TODO: Add a section explaining what this course will focus and what it will not.
Prerequisites
C++
As we will explore how to create applications with QML and how to integrate it with C++, it is necessary to have a decent knowledge of this programming language. A beginner level will be enough for a good portion of this course, but more advance chapter like TODO will require more of an intermediate level in C++.
CMake
The build system we used for this course is CMake. A minimum compression of how it works can be beneficial to better understand the setting up of a project and how to customize it. That being said, as the build system is not the focus of this course, we will provide complete CMake snippet that should work at out of the box.
Structure
- TODO: Add a section to detail how the course is structured, how the pieces of codes are organized, how to run them, where to find the sample projects, etc...
- TODO: Maybe add a few exemple of how use integrated code and admonish. Something like:
Code samples will be shown like so:
Rectangle {
    color: "red"
}
Credit
- TODO: Add what we used as a reference to create this book?
Getting started
The goal of this chapter is to create a working base project that you can use to test any example you want.
At then end, the project will contain a simple QML app built using Qt 6.8 and cmake.
A template can be found here.
This template contains the full QML project created during this chapter.
Don't worry if things seems a bit hard to understand, a recap will summarize everything at the end of the chapter. You can also clone the template from github.
Minimal CMake
In order to generate the project, we will use cmake. This tool will generate a build system of your choice using configuration files named CMakeLists.txt.
You can launch cmake using the basic command cmake, or use the GUI apps like ccmake or cmake-gui.
Requirements
You will need:
- A cmake installation (supported versions)
- An install of Qt 6 (you can find the installer on the qt website)
- A compiler (supported versions)
The version 6 of Qt requires at least c++17, in the following example we will ask for c++20 because why not.
Minimal cmake project
First we will need to initialize the cmake project.
Technically, for a minimum project need only a single CMakeFile.txt and your source files.
But for this project, we propose the following structure:
qml-template
    ├─ CMakeLists.txt #will be called the `root CMakeLists`
    └─ src
        ├─ CMakeLists.txt
        └─ qmlApp
            ├─ app
            ├─ assets
            ├─ widgets
            └─ CMakeLists.txt #will be called the `app CMakeLists`
This structure will be used all along this course, but feel free to use your own.
If you followed the proposed folder structure, you will need to add a CMakeLists in the src folder that contains the following line:
add_subdirectory(qmlApp)
To do that, we need at least the following lines in the root CMakeLists:
cmake_minimum_required(VERSION 3.21)

project(qml-template LANGUAGES C CXX VERSION 1.0.0)
You will also need to have at least a library or an executable, but we will see that in the next part.
Find Qt
As any other third parties, we will need to first find it using a find_package.
To do that, you can add the following line in the root CMakeLists
find_package(Qt6 6.8 REQUIRED COMPONENTS Core Qml Quick Widgets)
If Qt is not found, you will have to set the Qt6_DIR manually.
Usually the path is /path/to/qt/dir/{qt_version}/{compiler}/lib/cmake/Qt6.
With qt_version the full version (ex: 6.8.6) and compiler the name of the compiler used (ex: gcc_64)
To set it in the cmake build, you can either:
- Use cmake-gui
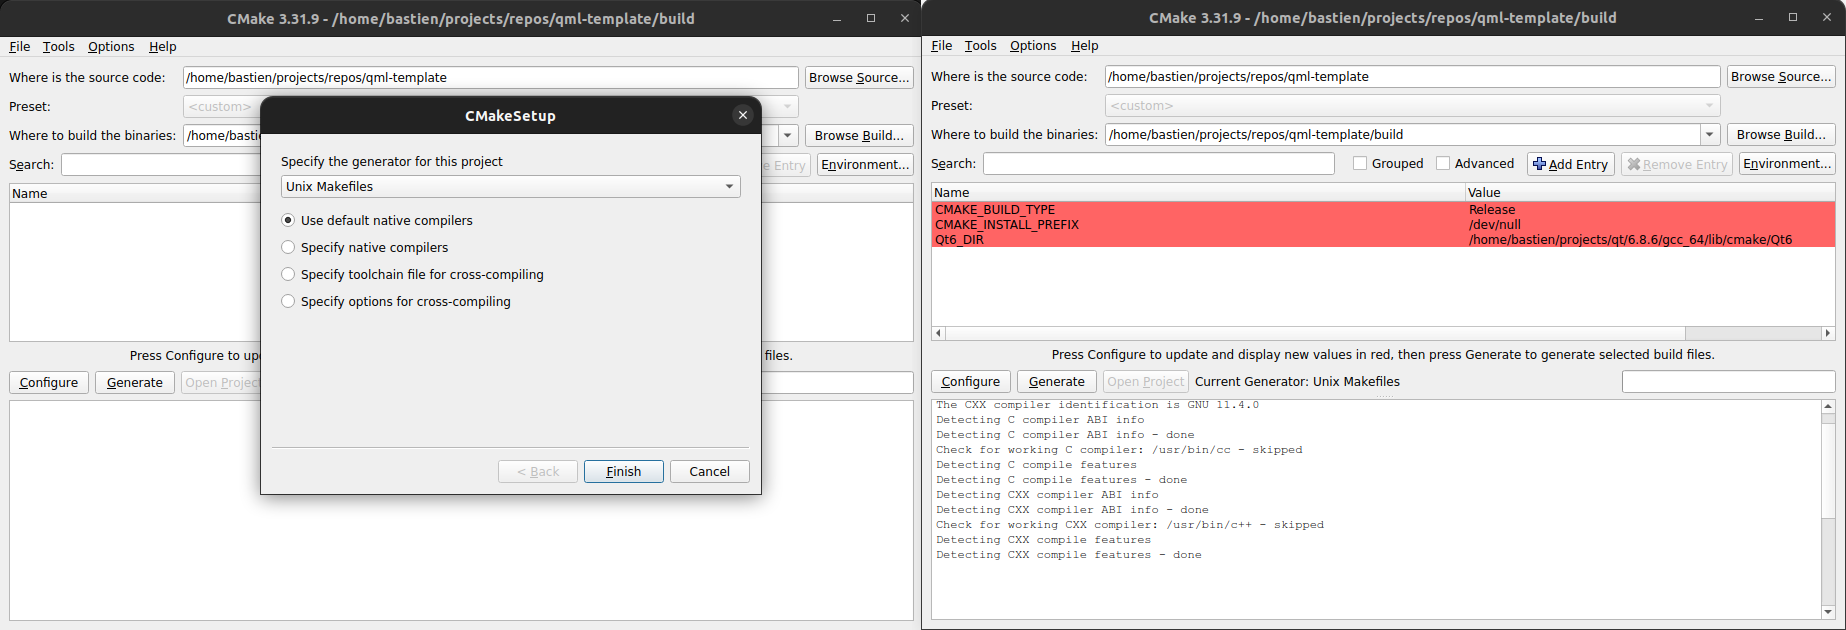
- Add the option in the cmake command:
cmake . -DQt6_DIR=/path/to/qt/dir/{qt_version}/{compiler}/lib/cmake/Qt6
Setup project
Once the library is found, we will need to call qt_standard_project_setup in order to set the default values of some cmake variables (see the full list here)
Thanks to this function, we no longer need to set CMAKE_AUTOMOC or CMAKE_AUTOUIC as we did when using Qt5.
In the end, here is the full content of the root CMakeLists:
cmake_minimum_required(VERSION 3.21)

project(qml-template LANGUAGES C CXX VERSION 1.0.0)

set(CMAKE_CXX_STANDARD 20) #Qt6 requires at least cpp17
set(CMAKE_CXX_STANDARD_REQUIRED ON)

find_package(Qt6 6.8 REQUIRED COMPONENTS Core Qml Quick Widgets)
if(Qt6_FOUND)
    message(STATUS "Qt found, version ${Qt6_VERSION}")
    qt_standard_project_setup(REQUIRES 6.8)
endif()
If you followed the proposed folder structure, you will need to add another line:
add_subdirectory(src)
This line will notify cmake that there is a CMakeLists in the given folder (here the src folder)
So this gives us the following code:
cmake_minimum_required(VERSION 3.21)

project(qml-template LANGUAGES C CXX VERSION 1.0.0)

set(CMAKE_CXX_STANDARD 20) #Qt6 requires at least cpp17
set(CMAKE_CXX_STANDARD_REQUIRED ON)

find_package(Qt6 6.8 REQUIRED COMPONENTS Core Qml Quick Widgets)
if(Qt6_FOUND)
    message(STATUS "Qt found, version ${Qt6_VERSION}")
    qt_standard_project_setup(REQUIRES 6.8)
endif()

add_subdirectory(src)
Build an app
Files
In order to build a minimal app, you will need 3 files:
- CMakeLists.txt
- main.cpp
- Main.qml
We will not go into the details of the Main.qml and main.cpp files for now. You can find examples in the following chapters and in the template.
On the cmake side, Qt gives access to new functions used to create executables or libraries.
Create target
When you build a QML app in cmake, you have to use qt_add_executable instead of add_executable.
This cmake function takes the same parameters as the original function.
You will then need to link Qt to this target using target_add_library. The minimal targets you need are:
- Qt::Core
- Qt::Qml
- Qt::Quick
- Qt::Widgets
This gives us the following code in the app CMakeLists:
set(_exeName "qmlApp")

set(_cppSources
    main.cpp)

set(_links
    Qt::Core
    Qt::Qml
    Qt::Quick
    Qt::Widgets)

qt_add_executable(${_exeName} ${_cppSources})

target_link_libraries(${_exeName} PRIVATE ${_links})
Add qml
In order to add qml files, we will need to use a new function: qt_add_qml_module.
We will no go through all the parameters so here is the doc.
Here are the parameters for a minimal case:
qt_add_qml_module(${_exeName}
    URI ${_exeName}
    QML_FILES ${_qmlFiles}
    RESOURCES ${_qmlResources}
)
- The first parameter is the name of the target
- URI is the name that will be used to import the widgets into the qml
- QML_FILES is a list of qml files
- RESOURCES is a list of resources like icons for examples. These will be accessible via the qt resource manager (more on that on a later chapter)
This gives us the following code in the app CMakeLists:
set(_exeName "qmlApp")

set(_qmlFiles
    app/Main.qml)

set(_qmlResources)

set(_cppSources
    main.cpp)

set(_links
    Qt::Core
    Qt::Qml
    Qt::Quick
    Qt::Widgets)

qt_add_executable(${_exeName} ${_cppSources})

qt_add_qml_module(${_exeName}
    URI ${_exeName}
    QML_FILES ${_qmlFiles}
    RESOURCES ${_qmlResources}
)

target_link_libraries(${_exeName} PRIVATE ${_links})
Now that we have the cmake setup, we can finally have a look at the c++ and QML files.
Main QML file
The Main.qml file is the first page that will be open by the app.
The main QML file can be named however you want, the only requirement is that the file start with an upper case letter.
In this course, it will be named Main.qml and stored in src/qmlApp/app
In this file, we will define the main parameter of the window define its content.
For now, we will no go further into details about these parameters.
import QtQuick
import QtQuick.Controls

ApplicationWindow {
    id: root

    title: "Simple QML app"
    visible: true
    width: 1280
    height: 720
    color: "grey"
}
Main c++ file
As you know, all c++ projects must have a main file containing the main function.
This main funtion will be used to initialized the QML application and start it.
To do that, you will need two things:
- A
QApplicationthat will contain the main information about the app like its name for example. - A
QQmlApplicationEnginethat will be used to load the main QML page.
In order to load the first page you will need to call the loadFromModule function from the QQmlApplicationEngine.
It take two arguments:
- The relative path to the folder containing the file
- The name of the file
#include <QApplication>
#include <QQmlApplicationEngine>

int main(int argc, char* argv[])
{
    QApplication app(argc, argv);

    // Init the qml engine
    QQmlApplicationEngine engine;

    // load main qml file
    engine.loadFromModule("qmlApp/app", "Main");

    const bool errorCode = app.exec();

    return errorCode;
}
Recap
Let's do a summary of what we have so far.
- A cmake file used to setup the project (the root CMakeLists):
cmake_minimum_required(VERSION 3.21)

project(qml-template LANGUAGES C CXX VERSION 1.0.0)

set(BUILD_SHARED_LIBS ON)

set(CMAKE_RUNTIME_OUTPUT_DIRECTORY "${CMAKE_BINARY_DIR}/${CMAKE_SYSTEM_NAME}-${CMAKE_SYSTEM_PROCESSOR}")
set(CMAKE_LIBRARY_OUTPUT_DIRECTORY "${CMAKE_BINARY_DIR}/${CMAKE_SYSTEM_NAME}-${CMAKE_SYSTEM_PROCESSOR}")
set(CMAKE_ARCHIVE_OUTPUT_DIRECTORY "${CMAKE_BINARY_DIR}/${CMAKE_SYSTEM_NAME}-${CMAKE_SYSTEM_PROCESSOR}")

set(CMAKE_CXX_STANDARD 20) #Qt6 requires at least cpp17
set(CMAKE_CXX_STANDARD_REQUIRED ON)

find_package(Qt6 6.8 REQUIRED COMPONENTS Core Qml Quick Widgets)
if(Qt6_FOUND)
    message(STATUS "Qt found, version ${Qt6_VERSION}")
    qt_standard_project_setup(REQUIRES 6.8)
endif()


add_subdirectory(src)
- A cmake file used to build the application (the app CMakeLists):
set(_exeName "qmlApp")

set(_qmlFiles
    app/Main.qml)

set(_qmlResources)

set(_cppSources
    main.cpp)

set(_links
    Qt::Core
    Qt::Qml
    Qt::Quick
    Qt::Widgets)

qt_add_executable(${_exeName} ${_cppSources})

qt_add_qml_module(${_exeName}
    URI ${_exeName}
    QML_FILES ${_qmlFiles}
    RESOURCES ${_qmlResources}
)

target_link_libraries(${_exeName} PRIVATE ${_links})
- A main c++ file containing the logic the initialize and start the app:
#include <QApplication>
#include <QQmlApplicationEngine>

int main(int argc, char* argv[])
{
    QApplication app(argc, argv);

    // Init the qml engine
    QQmlApplicationEngine engine;

    // load main qml file
    engine.loadFromModule("qmlApp/app", "Main");

    const bool errorCode = app.exec();

    return errorCode;
}
- A main QML file containing the content of the first window:
import QtQuick
import QtQuick.Controls

ApplicationWindow {
    id: root

    title: "Simple QML app"
    visible: true
    width: 1280
    height: 720
    color: "grey"
}
if you don't want to copy/paste all the code, you can clone this template.
Use a library
This chapter is not needed to continue the course. So feel free to ignore this part or come back later when your sandbox project start growing.
If you want to go further into the creation of the project, we can also create a QML library.
Libraries can be used to shared QML widgets between multiple apps. We will see how later in the course.
The template with the library can be found here
Create target
When you build a QML library in cmake, you have to use qt_add_library instead of add_library.
This cmake function takes the same parameters as the original function.
For qt_add_library, the function will:
- Create the lib target
- Finalize the target (doc)
Add qml
In order to add qml files, we will need to use a new function: qt_add_qml_module.
We will no go through all the parameters so here is the doc.
Here are the parameters for a minimal case:
qt_add_qml_module(${_libName}
    URI ${_libName}
    QML_FILES ${_qmlFiles}
    RESOURCES ${_qmlResources}
    NO_PLUGIN)
- The first parameter is the name of the target
- URI is the name that will be used to import the widgets into the qml
- QML_FILES is a list of qml files
- RESOURCES is a list of resources like icons for examples. These will be accessible via the qt resource manager ( (more on that on a later chapter))
By default, for a library, the qt_add_qml_module will create another target named myLibplugin (if the original lib is names myLib) (see doc)
The original target will contain all the source code and the plugin target will contains the qml import logic, so that the widgets from the lib can be used in the app.
Link to app
If you only want to use the cpp files, you have to link the original library (ex: myLib). But if you also want to use the qml, you will have to also link the plugin library (ex: myLibplugin).
This can be a bit of a bother when you plan to always use them both.
That is why we can add the NO_PLUGIN parameters. This will merge both targets, allowing you to only link the original target.
And finally, you can import the library into the qml using import myLib
set(_libName uiLib)

set(_qmlFiles
    widgets/Hello.qml
    widgets/SimpleIcon.qml)

set(_qmlResources
    assets/icon.svg)

set(_publicLinks
    Qt::Core
    Qt::Qml
    Qt::Quick
    Qt::Widgets)

qt_add_library(${_libName} STATIC)

qt_add_qml_module(${_libName}
    URI ${_libName}
    QML_FILES ${_qmlFiles}
    RESOURCES ${_qmlResources}
    NO_PLUGIN)

target_link_libraries(${_libName} PUBLIC ${_publicLinks})
In the app:
import uiLib

ApplicationWindow {
    id: root

    ...

    Hello {}
}
QML Basics
In this chapter you will create your first application with QML. You will explore the basic structure of a QML file and learn how to place your first element in anwindow. And, because practice makes perfect (or as French say c'est en forgeant qu'on devient forgeron"), you will also complete your first exercice and start experimenting with QML.
QML Basics
Some code:
int main() {
    std::cout << "Hello world!\n";
}
some qml:
Item {
    anchors {
        fill: parent
        margins: 10
    }
    visible: true
}
List of directives